tips for serving trays
the assembly of the serving tray is easiest when done as follows. you
will need a #2 phillips screw driver. any powered drill or screw driving
guns electric or battery operated are not recommended until one is very
familiar and comfortable with the assembly of the trays.
- remove the protective film and sublimate the thb tray bottom. since these
parts are of a larger surface area than you may be accustomed to, we recommend
a 90 sec. hold time @ 400° f with firm clamp pressure.
- please exercise extreme caution when removing the thb from your heat press.
using an oven mitt or rag when removing any items from your heat press
is recommended.
- warping can be minimized by allowing the board to cool face down on a
flat, firm surface with a flat weighted object on the back of the board.
if warping is severe, the board can be heated again on the backside for
20 seconds and allowed to cool as described above.
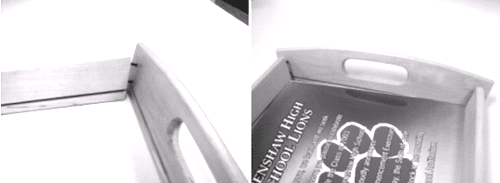
- pre assemble one end rail and the two side rails. this is best done by
installing the 2 screws on each side ½ way only. if the end piece
is left loose, it will be easier to slide the bottom into place. in doing
so, the bottom becomes the guide that aligns the two side rails to the
end rail.
- slide the sublimated base into the slots of the side rails first and end
piece second. the amount of warp in the tray bottom, the relationship
of the slots in side rails and end rail and the accuracy of the assembly
holes can all lead to slight difficulties in assembling. loosening one
or both of the screws slightly may help in aligning the components.
- with the tray bottom, two side rails and the one end rail in place, the
4 screws on the first end rail can be tightened until the screw head is
almost flush.
- do not tighten any screws until the tray is completely assembled.
- pre-assemble the second end rail again leaving the screws loose.
- slide the tray bottom toward the second end so that at least a 1/16"
extends beyond the end of the side rails. it is now possible to align
the second end rail to the sides.
- you can tighten all the screws. it is best to tighten each screw a little
at a time and keep switching from end-to-end and corner-to-corner. this
will help to keep the tray square as you tighten the screws. do not over
tighten! this may split or strip the wood.
- cover the 8 screws with the 8 wooden buttons provided. glue in if desired,
but you will not be able to remove the screws and change the bottom if
the plug is glued in.
- place the four self adhesive foot pads on the bottom four corners of the
tray. there may be some slight misalignment in the side and end rails.
this is normal.
|